In this video I’ll be demonstrating how I my own oil wax wood finishing product.
But first, I thought I'd explain why, as there were a few reasons
Firstly I’ve recently run out of Briwax which is a product that I use quite often as a finish, at least for items I make that don’t need a lot of protection from moisture.
Secondly, Briwax is great for adding a really smooth finish and a nice subtle sheen to wood, but it doesn’t really pop the grain, so what I usually do is apply boiled linseed oil to pop the grain, wait for that to dry, and then apply Briwax, then I wait for that to try and then buff it out with a cotton cloth. I wanted my finish to be a blend of oil and wax as that will help speed up my finishing process a bit.
Thirdly, I thought that if I could make a product that I was happy with, it's something that I can make in bulk and then sell via my Etsy store.
And finally, I just like making things, and it's just something I was interested to try.
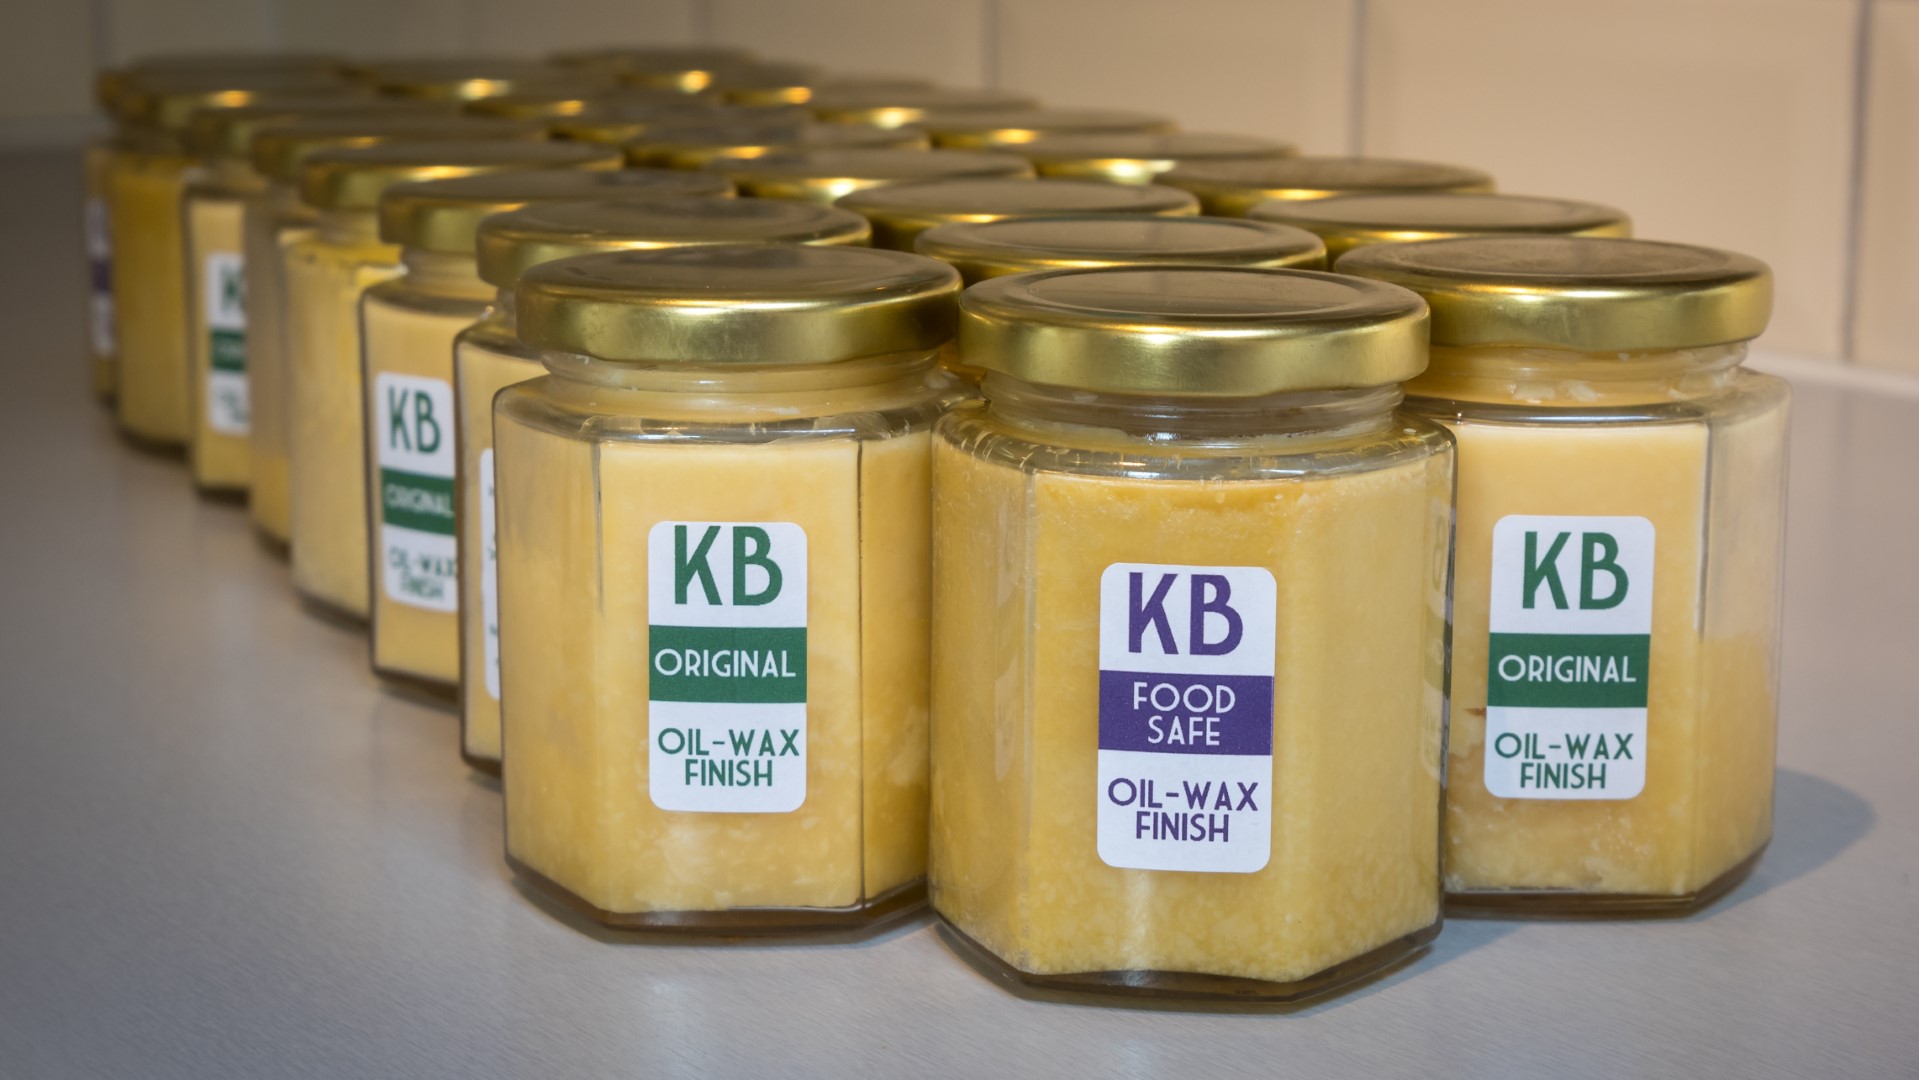
I wanted to try to make two different types of finish– a food safe blend which I can use on cutting boards and things like that, and also a non-food safe blend which is the one I thought that I'd use most frequently as I don’t make a lot of cutting boards.
The ingredients I needed were: beeswax which will be what helps to solidify the finishes, and when it's applied to wood it'll add durability, smoothness and a nice sheen.
I'd also need two types of oil – mineral oil for the food safe version and boiled linseed oil for the non-food safe version. The oil will be what pops the grain of the wood, nourishing the wood and making it look beautiful and it'll also add some protection to wood too.
And white spirit, but that will be added to the non-food safe finish only because obviously it’s not safe stuff to ingest. The white spirit will help to speed up the drying process of the finish and also because it dissolves wax, it will also help to blend the ingredients of the finish and make it soft and smooth.
I first did a few experiments making some finishes using different wax and oil quantities before deciding what the formula was that I liked the most – and I tried those different blends out on some scraps of wood to see how they looked, how smooth they were when buffed, how long they took to dry, and also how easy they were to apply, that sort of thing.
And then once I knew what quantities I wanted to use, I could start making my first batch, so I ordered a bunch of glass jars, 72 in total, and I bought these on Amazon, I’ll leave some links in the description box if you're interested – the more of these you buy the cheaper they are, which is why I bought so many.
I got some beeswax on eBay, this is available in block form which is what I have here, or you can also buy it in pellet form, and in hindsight it would have saved me a lot of time if I’d have bought it as pellets because it’s actually harder than I expected to chop up with a knife – even a very sharp knife. Another alternative with the block of beeswaax would have been to use a cheese grater but I didn’t want to ruin my one and only cheese grater and get in trouble with the lady, so I persevered with the knife chopping! Once it was chopped up in to smaller pieces, the beeswax needed to be melted, and because beeswax is highly flammable, the safest way to do this is to use what I believe is called a bain-marie in cooking terms, which is basically one large pot with some boiling water, and another smaller pot floating on that water which contains the wax, and it’s important to use a low heat and keep a close eye on this to make sure there is no risk of the wax getting anywhere near the burner and be very careful to do it as safely as possible. Eventually the wax melts down in to a liquid. I’m using a couple of old saucepans here, and I won’t ever use these for cooking again because once you get wax on them it’s extremely difficult to remove. So don't go using your favourite saucepans for this, maybe use some old ones or pick up some secondhand ones to use
I already had a big 5l bottle of boiled linseed oil and a couple of 1l bottles of mineral oil that I could use, and I bought a few bottles of white spirit too.
First I made the non-food safe finish, and for that I found that the best ratio was one third boiled linseed oil, one third white spirit and then I added one third of the melted beeswax. I just did this by eye rather than measuring out the quantities, and that worked absolutely fine. When I did my first experiments I found that it’s really important to mix really thoroughly and quickly too because as soon as the hot wax hits the cold ingredients, and the cold sides and bottom of the glass jar, it immediately starts to solidify. I used a piece of beech dowel to mix up the ingredients, and that was good for getting right to the bottom of the jar to scrape the bottom and make sure it was well mixed. Once it was mixed thoroughly I put the lids on and left them outside to cool down.
For the food safe version I found that once again equal quantities worked well, but maybe a fraction more mineral oil than wax, because I want the wax to be soft and easy to apply.
So I poured in a little over half mineral oil, and then added the hot beeswax, mixing thoroughly again with a beech dowel and I used a clean dowel for this because I didn’t want to cross-contaminate the non-food safe ingredients with the food-safe one at all. And then I left those outside to cool down too.
The whole process of making this stuff is quite messy, and once you get drips of beeswax on anything it’s difficult to get it off without using white spirit, so to be honest doing this kind of thing in your kitchen isn’t really ideal. I used a piece of Perspex over my worksurface to protect it and for easier clean up. What might be a better idea would be to do it all outside, using something like a gas camping stove for the bain-marie, that way if you accidentally spill some wax or oil on something it’ll be less of a problem.
Next I used a rag soaked with some white spirit to clean up the outside of all the jars to remove any drips or residue and clean them up as later I’ll be adding some stickers to these jars and I wanted those to stick properly.
Then I designed some simple labels to put on the jars and I got them printed up at a local print shop. I did a front label, an information label and an instructions label for each of the two finishes, and I used different colours for the labels – green for the original and purple for the food safe, just so it makes it easier to know at a glance which is which.
Both of these finishes work really great, and I’m not just saying that because I’m now selling it, I’m genuinely going to be using this going forward instead of Briwax so you’ll see me using it in future videos. And by the way these are traditional recipes anyway - this isn't something that I've come up with myself. But anyway it’s relatively easy to make - if you want to have a go yourself, I'd recommend learning from my mistakes – so 1. consider buying beeswax in pellet form, 2. make sure you mix it really thoroughly when you add the wax, 3. don't use your best saucepans and 4. try and do it somewhere where you can make a bit of a mess, because you will spill some wax or some oil at some point during the project, I can almost guarantee it.
If you don’t want to make your own and you’re interested in buying some of mine, that would be fantastic, it’s available now on my Etsy store, link to that in the description box below. I’m not sure if I’ll continue making it – it really depends on how well it sells and whether it works out to be financially worth the time I put in to making it. If you want to support my channel but also get something back in return, then buying this is a great way to do that.
I hope you found this video useful – please subscribe if you haven’t already for more weekly woodworking videos - and thank you for watching
Images: