In this video I make an armchair using one sheet of plywood.
This project is a collaboration with John Heisz from I Build It - check out his video here: https://youtu.be/-uvjAVQqnyo
John's YouTube Channels:
I Build It main channel:
https://www.youtube.com/user/jpheisz
I Build It second channel:
https://www.youtube.com/channel/UCzGbp-rRVNwyFhn9gHoZr5g
I Build It Scrap Bin:
https://www.youtube.com/channel/UCaJsEh2_YxWHMcjASs4cJcA
I Build It Home:
https://www.youtube.com/user/IBuildItHome
As an Amazon Associate I earn from qualifying purchases
Digital Angle Gauge: https://amzn.to/2ssp72C (Amazon UK) https://amzn.to/2slzfLr (Amazon US)
Biscuit Strength Joint Testing Video:
https://www.youtube.com/watch?v=8WH7T4b9l2g
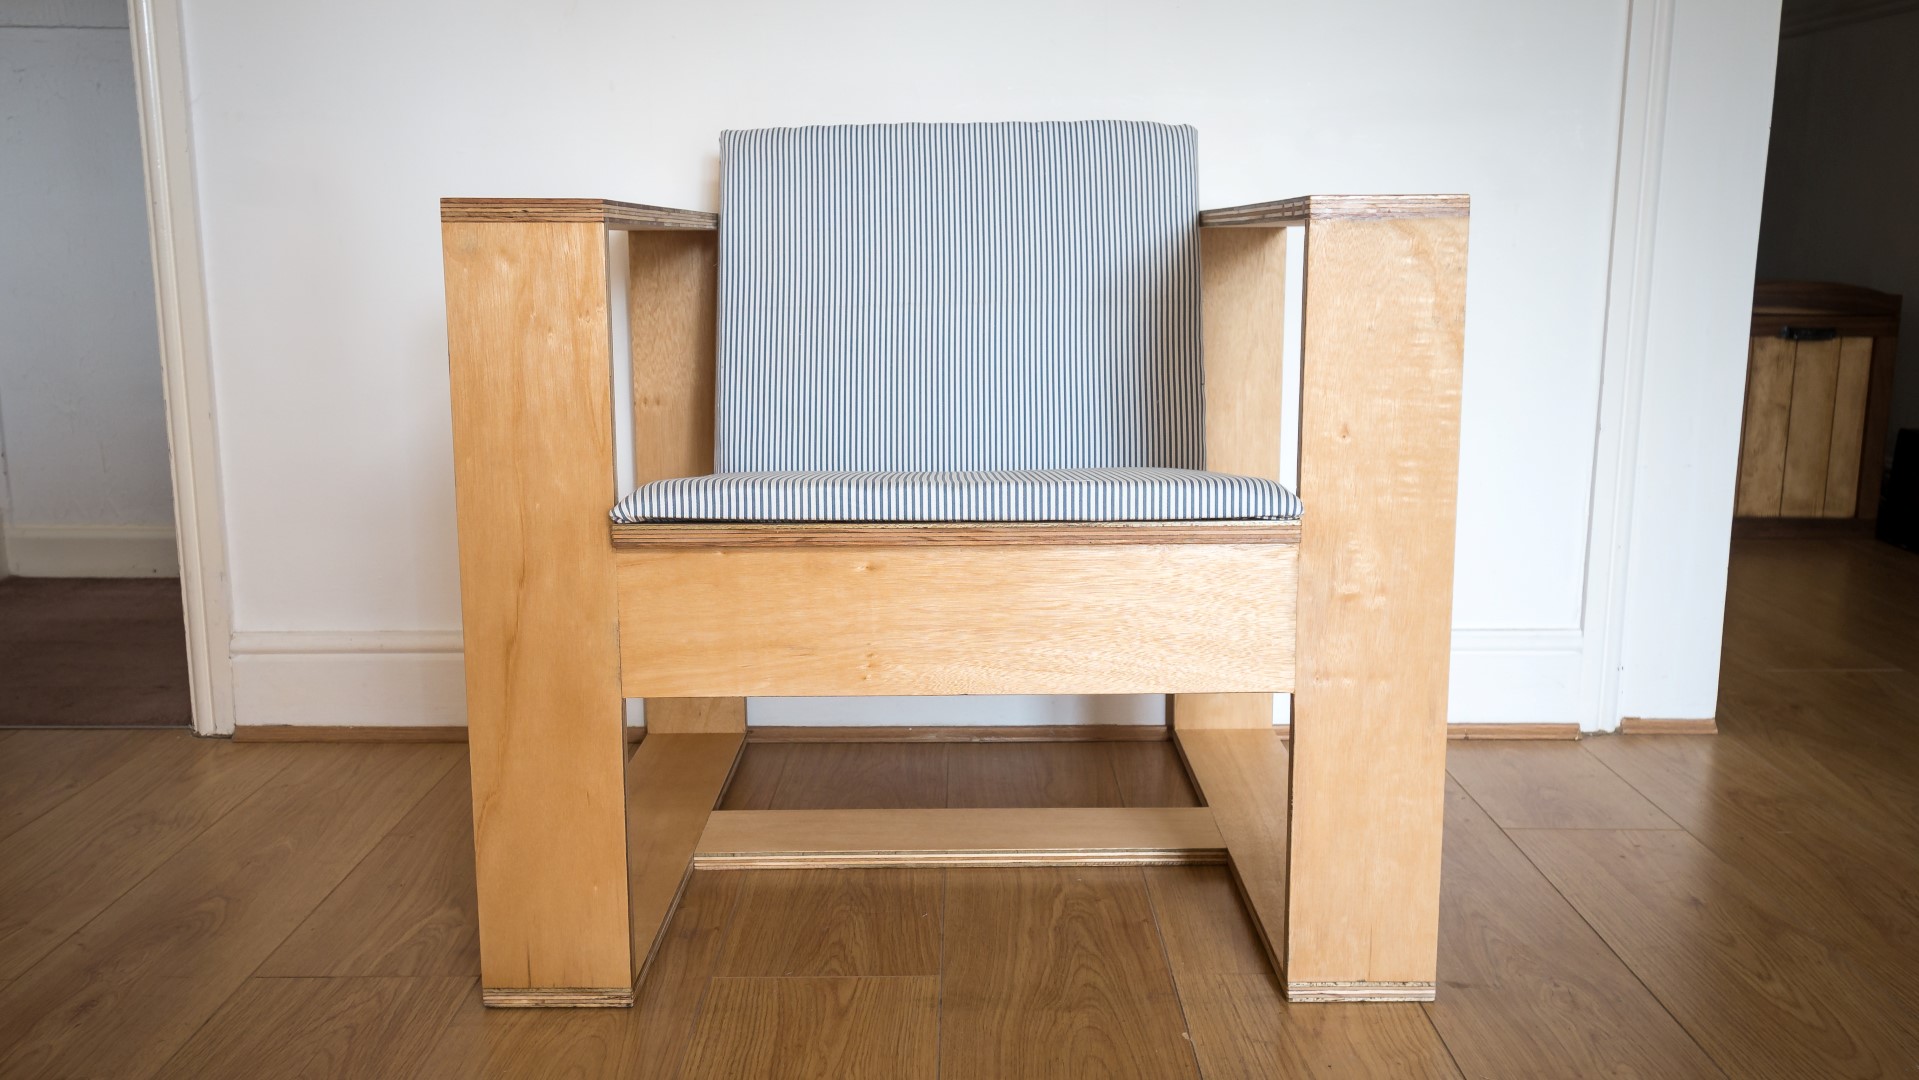
This video is a collaboration project with one of my favourite YouTube Woodworkers John Heisz. A while back I mentioned in one of my videos that I'd love to work with him. He got in touch, we talked through some ideas and the project we decided on was a challenge to design and build a chair using only a single sheet of plywood.
I've added a link in the description to John's chair build video - both videos have been released at the same time.
So first I needed to design a chair that I wanted to build, and that was a lot of work in itself so I'll be uploading a separate video about how I designed the chair - this video is focusing on the build itself. Plans will be available for this build via my Patreon page.
For materials, I had hoped to buy some nice birch ply for this build which would have looked really nice for a furniture project like this one, but it was just so expensive, it was around £89 for an 18mm sheet at my local timber merchant. I just couldn't justify the cost. So instead I opted for a far eastern hardwood 18mm ply at around £50 per sheet. I got them to rip the sheet lengthways just so that I could fit it in to my van and also through my house and out to my workshop.
If you're new to my channel you may not know that 90% of all my builds are made with salvaged materials - this is one of the few exceptions, as while I have quite a bit of salvaged plywood, I didn't have enough for this project.
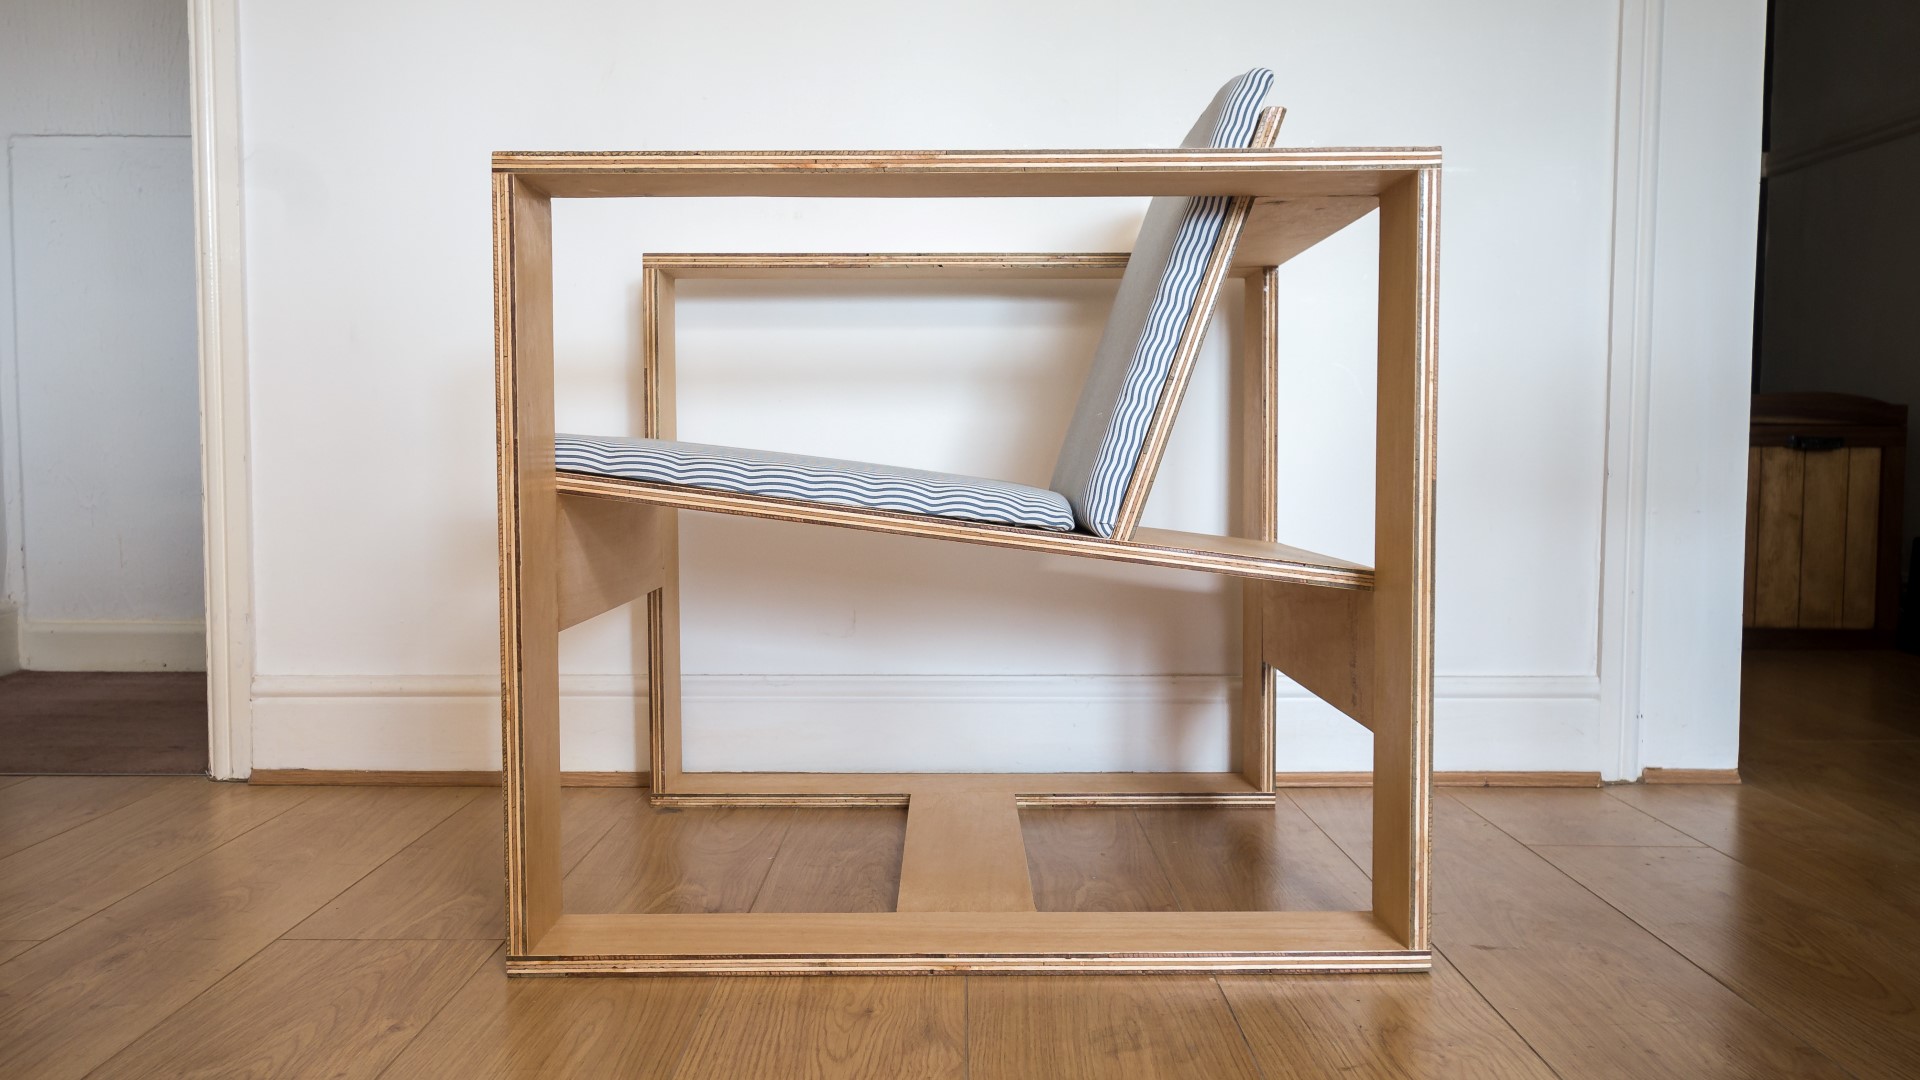
I'd start by making the two rectangles that form the arms of the chair.
Before I could make any cuts at the tablesaw I needed to cut the ply down even more to get the pieces to a size that I could manage with in my small workshop so I used my circular saw to make some rough cuts which were slightly over sized.
And then I could use my panel sled at the tablesaw to cut the pieces accurately to the lengths I needed.
Then I set my tablesaw fence and ripped the pieces to width based on the measurements from my drawing.
So now I had 8 pieces in total, 2 longer and 2 shorter pieces for each of the 2 rectangles.
I decided just to use glue and screws for what would be the bottom of each rectangle as these screws wouldn't be visible on the bottom of the chair.
After marking up the position of the screws I added the glue and used a speed square to keep the corners at 90 degrees, and then I driller pilot holes with a coutnersinking bit and added some 50mm screws.
I used a knife blade to scrape away the excess glue.
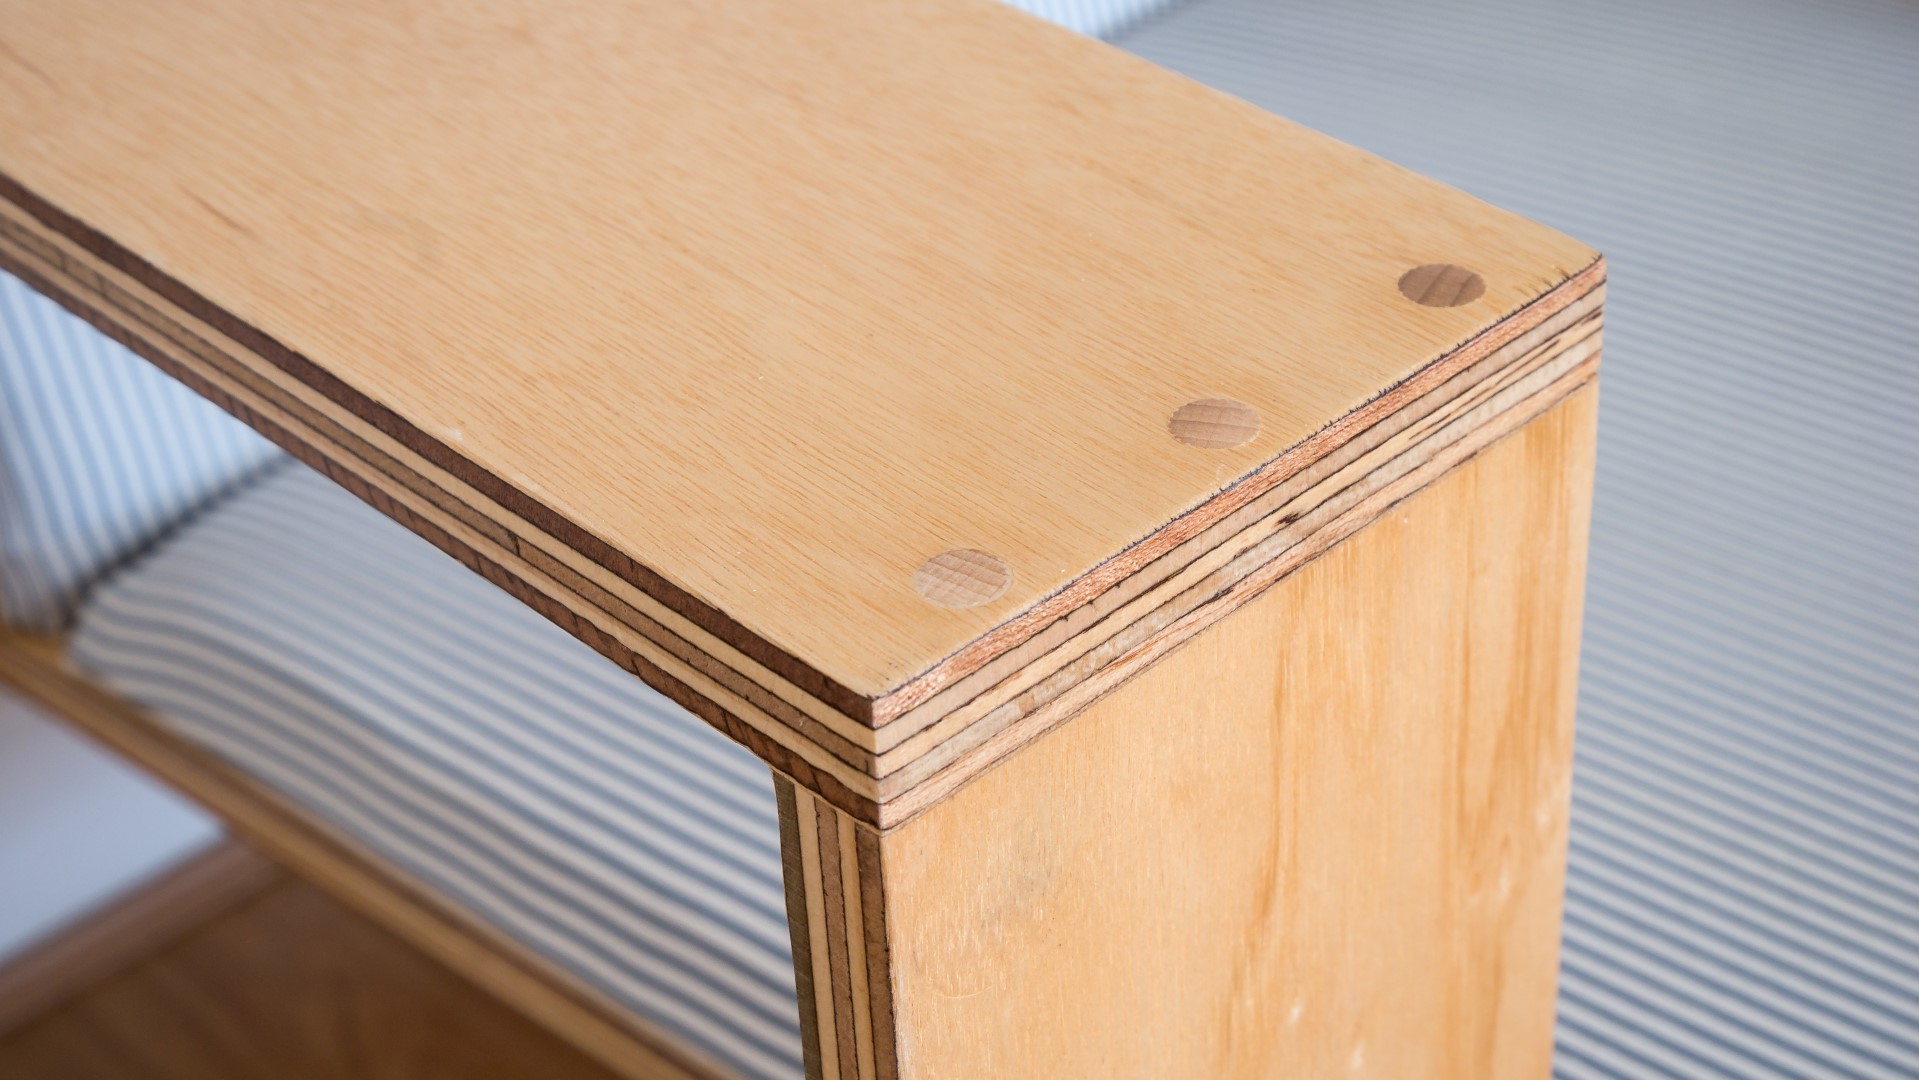
Next I added the top panel for the arms just with glued butt joints initially, making sure to get the edges nice and flush and I put them out in the sun so the glue would dry quicker.
I then wanted to re-enforce those butt joints with some dowels, and I'd use these 40mm long, 10mm wide beech dowels.
To get all of the dowels spaced nice and consistently I decided to make a simple jig out of a scrap of plywood cut to the same width as the arms of the chair. I marked up the spacing then marked a line through those marks with a speed square and drilled with a 10mm bit. I used the drill press for this to ensure that the holes were at 90 degrees.
Then I marked up 9mm either side of the line to indicate what would be the 18mm thickness of the ply and used some hot glue to stick on another piece of wood to use as a fence lined up with one of those lines
I trimmed off the excess at the bandsaw and that was the jig ready to use.
Then with the 10mm drill bit in my drill I added some tape to indicate the depth I wanted to drill holes to accommodate the dowels.
I could then use the jig, clamped in place to start drilling the holes. Once the placement of the holes was established I could remove the jig and drill the holes to their full depth using the piece of tape as an indicator.
I added some wood glue and used a mallet to seat the dowels
I wiped away the glue and then used my japanese pull saw to cut the top of the dowels flush.
After adding the rest of the dowels, the two arm rectangles were done so I could move on to making the bracing pieces that would sit in between the two arms and support the chair - there'd be four bracing pieces: a top, a front, a back and bottom brace, and I ripped all of them to the same width as I'd used for the arm pieces earlier.
I set up a stop block at the mitre saw and then cut all the braces to length - they all needed to be the same length - which would be the distance between the two arms of the chair.
Three of the four braces would need an angled bevel cut along one of the long edges, and I used the protractor tool in SketchUp to figure out what those angles needed to be from the drawing.
I'd cut the bevels at the tablesaw and I used my digital angle gauge to set the angle of the blade. I get asked about this tool a lot, so I've included a link to it in the desciption box below this video if you want to check it out.
The front and back braces needed a cut with the blade at 83 degrees - these 83 degree angles would support the seat and to give it a 7 degree tilt.
I just ripped off as little as possible from the width of those two pieces to establish the angle, and then marked them up with a pencil so that I wouldn't get the pieces confused later.
The blade was set to 71 degrees for the long edge of the top brace, that would support the back of the seat which would be angled at 19 degrees.
And the final brace at the bottom didn't need any angled cuts.
I'd use dowels again to join the bracing pieces to the arms of the chair, but first I needed to adapt my jig, so I added another fence to the other side of the dowel holes using a piece of the ply I was using to get the spacing correct.
And that enabled me to put the jig on to the end of the bracing pieces. I drilled the first hole just by holding the jig firmly in place with my other hand, then I added a dowel to keep the first hole correctly alligned while I drilled the next two holes. Then I could remove the dowel as it had served it's purpose.
I did this to each end of all of the bracing pieces.
Next I needed to drill the corresponding holes on to the arms that the bracing pieces would fit in to, so I measured and marked up the position based on the dimensions from the drawing, clamped the jig and drilled those holes too. The piece I'm drilling here is for the bottom brace so it's centred to the bottom of the arms
So it's time to own up to a mistake I made when drilling the holes for the dowels in to the arm pieces. It was really important to make sure that the holes were mirrored on to the inside of each arm so that the dowels at the end of the bracing pieces would correspond with the holes on the arms, and I got that right for three of the four braces, but for one of them I managed to drill the holes for the top brace on the wrong side of the top of one of the arms. I did have enough ply remaining to make a new arm for the chair so I thought about doing that, but then I decided not to, because this is mainly a concept project and I wasn't even sure if it would be a success or not, so I decided that I'd just fill the 3 mistake holes with dowels later on, and just live with it like that. Fortunately I like the way dowel ends look anyway, so I wasn't too bothered about it but it is a shame that I didn't get it right
H ere I'm marking up for the front brace and repeating the process and I did the same again for the back brace too.
Then I added some wood glue and hit the dowels in place ready for the braces to be added I used a mallet to seat the bracing pieces and then added some clamps to get the joints tight.
One of the bracing pieces didn't quite go in straight enough for some reason, so I added another piece of ply to it with some more clamps to straighten it out and that worked well.
At this point I realised I'd made another mistake, although not one that was difficult to solve, as I'd forgotten to add the top brace, so I did that one next.
I left that for a few hours to dry and then I brought the chair in to the workshop. I glued in the rest of the dowels and then I could add the other arm of the chair to the assembly.
This took some fettling as it was quite difficult to get all 12 of the dowels alligned with the holes at the same time before the glue started to set, but I managed to get it all in OK in the end and clamped together the assembly.
While the glue was drying on the frame I could cut the remaining pieces to form the chair which were the seat itself and the backrest.
I cut off the amount of ply that I needed to work with using my circular saw and then did the more accurate cuts at the tablesaw again.
I could then glue in the seat panel and again I added some clamps.
For the backrest I needed to cut one more angled edge for where it would meet the seat, and that would need to be cut at 78 degrees.
I could then glue on the backrest, making sure that the angle at the bottom was seated properly on to the seat panel.
I drilled pilot holes from underneath making sure to angle the drill bit correctly to match the angle of the back rest, and added a 50mm screw to each side to pull the glue joint together and re-enforce the joint.
For the where the backrest met the top brace, I just fired in three brad nails to hold it in place until the glue dried. The nail holes would later be filled so they'll be almost invisible
With the chair fully assembled I had lots of sanding to do, I sanded everything at 120 grit.
I sanded all the faces, the dowel joints and the plywood edges to make them nice and smooth ready for finish to be applied.
I also sanded all the sharp corners by hand just to soften them and prevent the plywood from splintering.
And I filled the nail holes with some wood filler and sanded off the excess once it was dry.
At this point I decided that the front and back edge of the seat panel would look better if they'd been cut at an angle. So I used my handplane to take a few shavings to get them parrallel to the upright pieces of the legs.
This was really quite a challenging build for me and it took two and a half days in total. I really like the way that the chair looks. Designing the chair, and doing the dowel joinery and assembly were the parts that I found to be the most tricky,the rest of it was relaticely straightforward.
Images: